
Complete Guide to Installing a Dashcam in Your Car
If you're looking for a way to improve your safety on the road and protect yourself in the event of an accident, having a dashcam installed in your car is a great way to stay protected while driving. It can provide you extra peace of mind while providing you with hard evidence of incidents on the road.
In this article, we’ll help guide you through the process of installing a dash cam in your car, along with some helpful tips and guides along the way. From the perfect placement of your camera to routing the cables in your car. We’ll help you streamline the process so that by the end of the article, you’ll be an expert at installing dash cams.
Benefits Of Installing A Dash Cam

One of the main benefits of installing a dash cam is having an extra set of eyes on the road. Not only do dash cams provide you with peace of mind while you drive, but video recordings can also be used as evidence for legal proceedings or insurance claims. In addition, dash cams can deter reckless driving and deter others from criminal activity. It is a small addition to your vehicle that can bring many benefits.
Essential Considerations Before Installation
Once you’ve chosen the right dash cam for your vehicle, it’s time to start thinking about installation. After all, the success of your new setup depends on a proper and secure installation. Before getting started, consider the following:
Choose the right location to mount your dash cam. You’ll want the dash cam placed as centered as possible for maximum reach on both the left and right sides of your car. For most dash cams, placement is ideal if it does not obstruct the driver’s view. Many users place their dash cam behind the rear-view mirror or next to it. For rear-view mirror dash cams, you can simply place it over your existing rear-view mirror and adjust the camera lens.
Choosing a well-positioned power source for your dash cam can help you plan ahead for a more seamless and integrated setup.
Most models require a constant power source and some may require hardwiring into your vehicle’s electrical system for a permanent power supply. If you are uncomfortable hardwiring your dash cams, consult with a professional installer. For a detailed guide on how to hardwire your dash cam, visit our guide here.
Installing a dash cam is relatively easy and straightforward, with the right set of tools and knowledge, you’ll be able to set up your dash cam effortlessly and enjoy the benefits right away.
Installing Your Dash Cam
Now that you've got all the pre-installation steps taken care of, it's time to get your dash cam up and running! Out of the box, you should have everything you need to get started. Installing your dash cam is relatively straightforward and in a few easy steps, you’ll have your camera set up in no time!
Follow the guide below to get started:
1. Identify a Suitable Mounting Spot
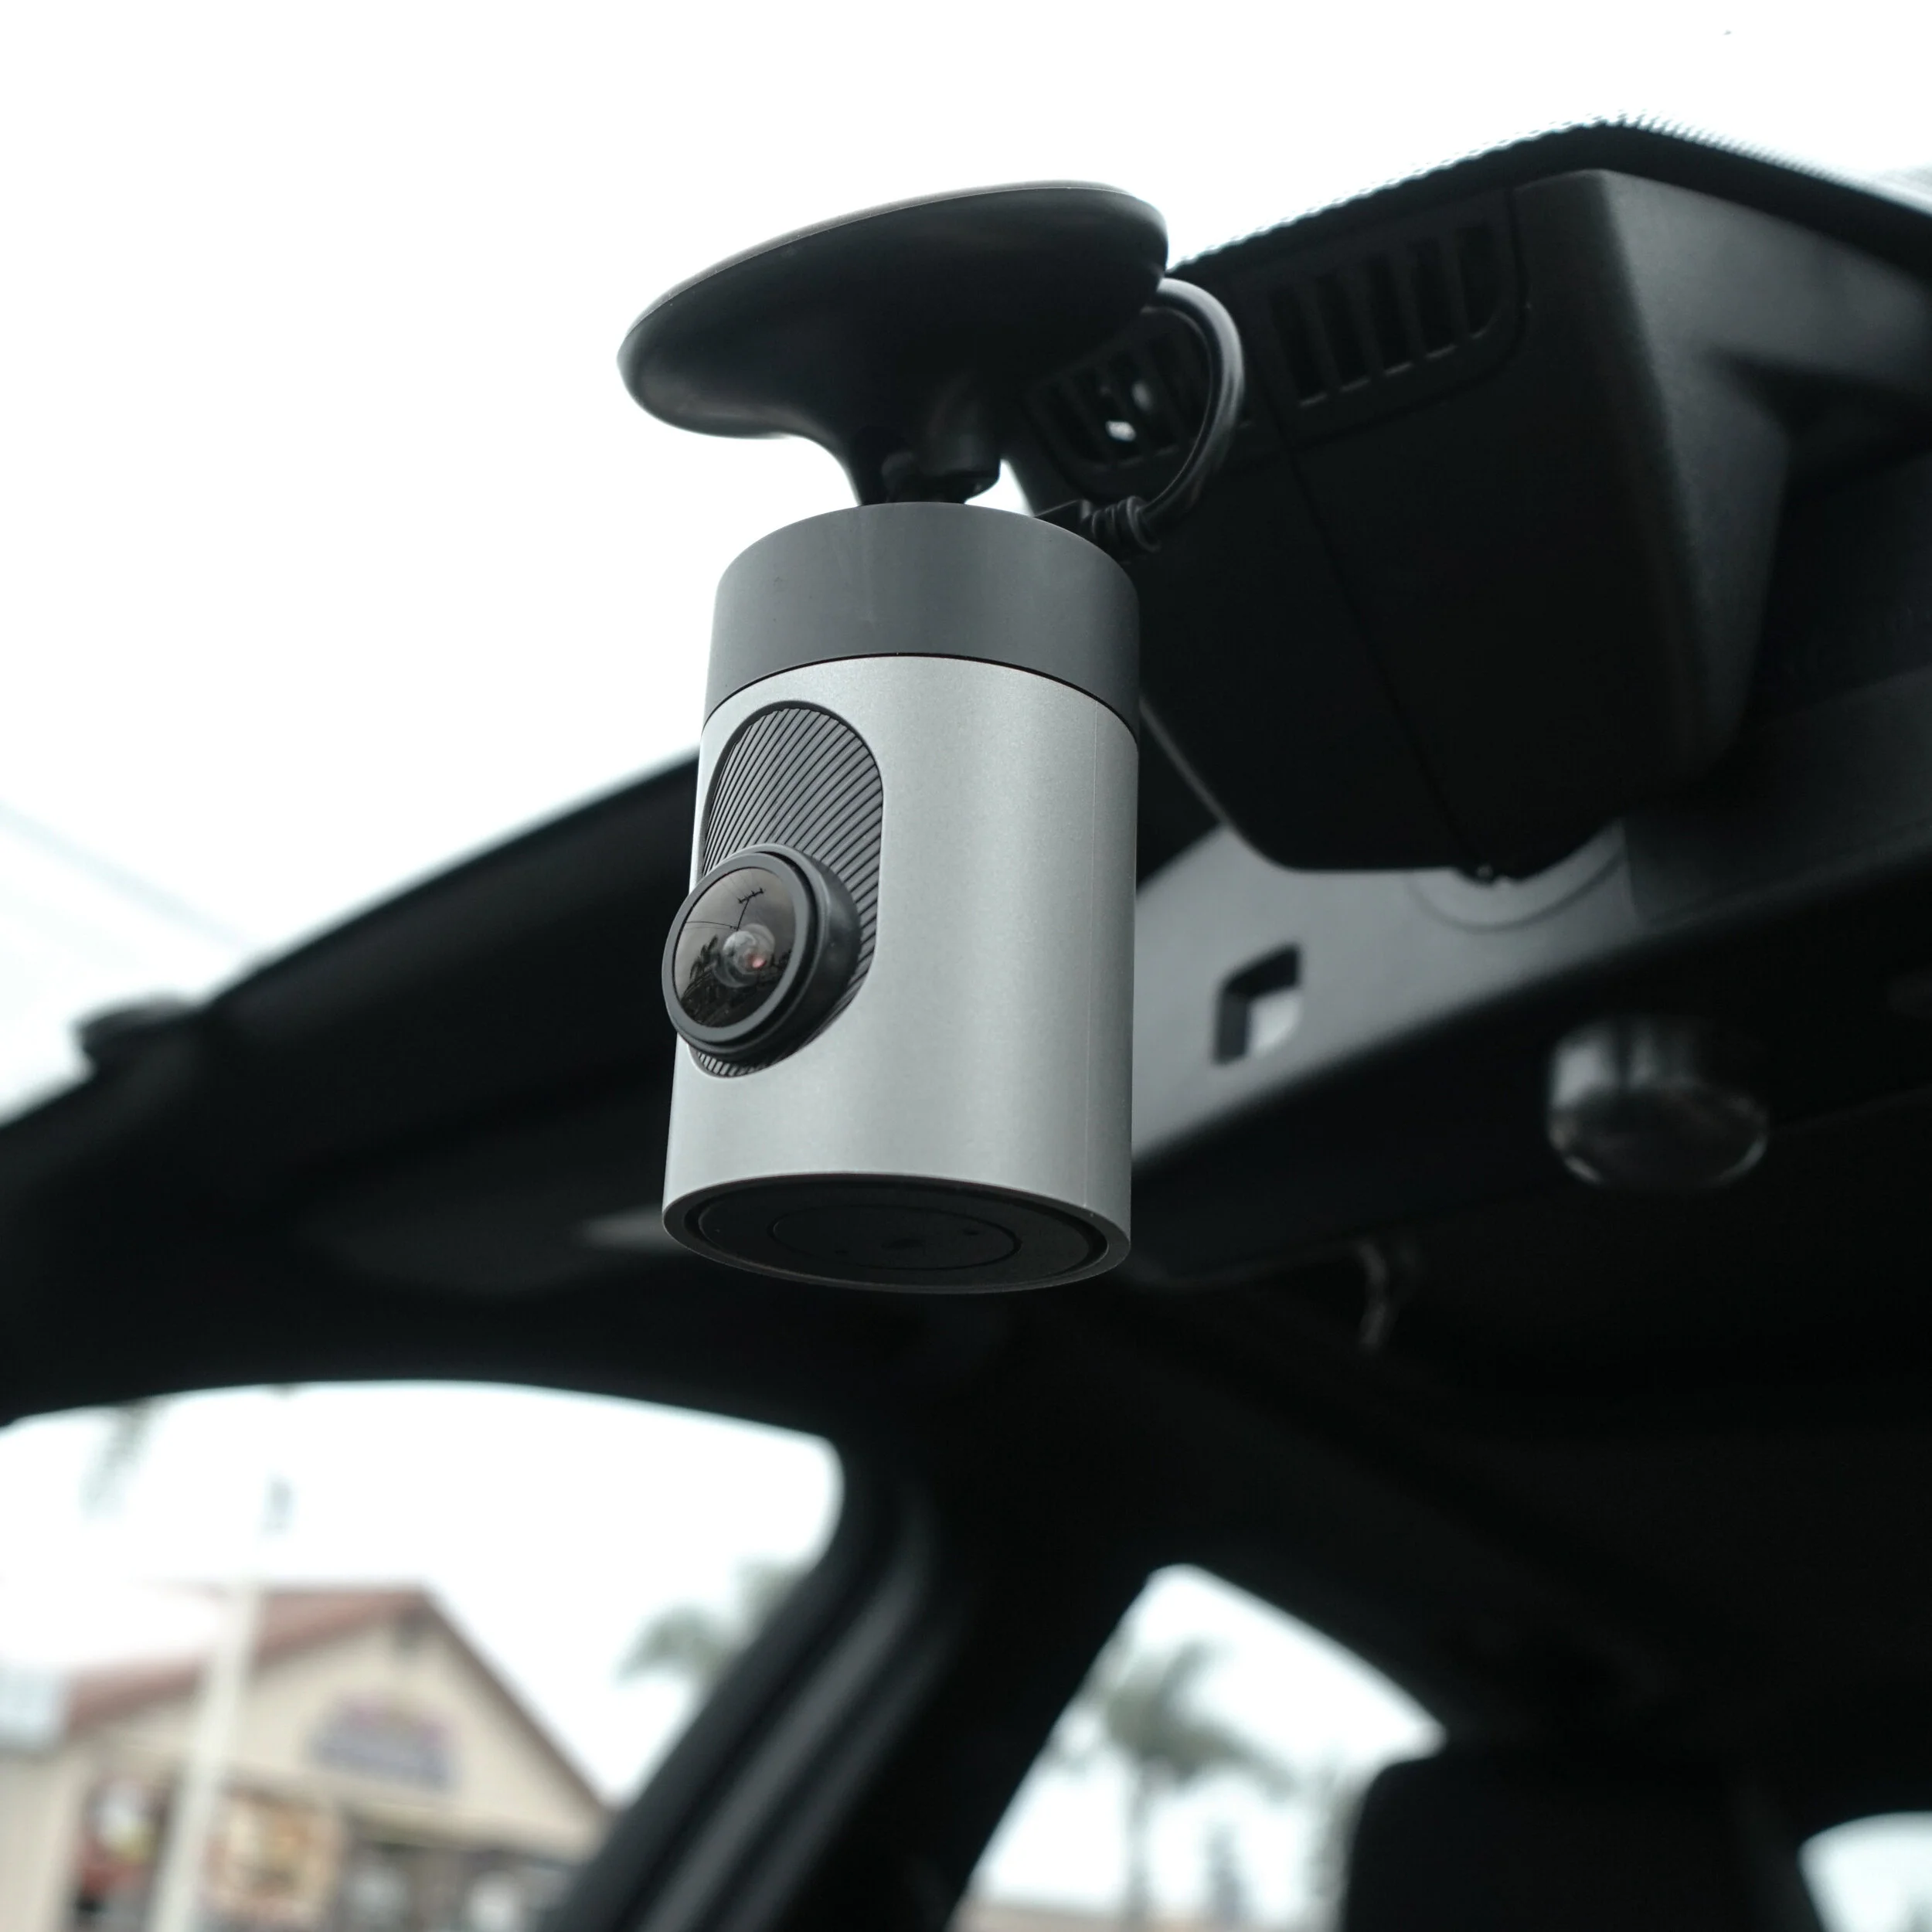
Locate an area that allows for a secure and stable fit. Position your dash cam as centered as possible to maximize coverage of both the left and the right side of your vehicle. For most users, this means placing your dash cam behind the rear-view mirror. Make sure your dash cam is securely mounted and not obstructing the driver’s visibility or any car functions.
Consult with local state laws in your area before installing your dash cam. Certain restrictions and limitations may apply to the placement of objects on the windshield of your vehicle. In general, placing a dash cam behind the rear-view mirror away from the driver’s view is considered reasonable and safe. You can read more about the laws surrounding dash cams here.
2. Locate a Power Supply
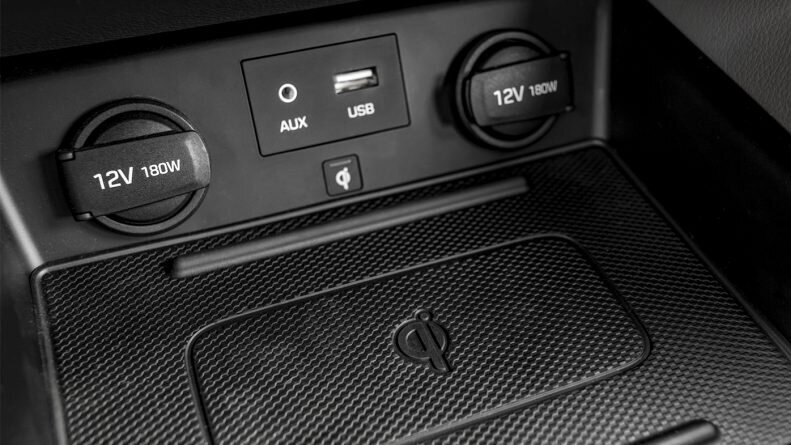
Locate the nearest power source closest to where you plan to mount your dash cam. For most drivers, a USB outlet or a 12V cigarette socket can be found inside your arm-rest compartment, on the center console, or somewhere on either side of the driver or passenger side. By identifying the nearest power source, you can now strategically plan how your cables can be routed to minimize any cable obstruction.
If you plan to use your vehicle’s USB charging outlet or cigarette socket, make sure the power outlets turn off with your vehicle and that they do not maintain power when your vehicle is completely turned off. Leaving your dash cam running plugged into a constant hot outlet can potentially drain your vehicle’s battery and lead to overcharging.
3. Route Your Cable
In this step, we’ll be routing our cables within the frame of your car so that you can hide your cables. By utilizing and understanding the structure and frame of your vehicle, we can effectively set up your dash cam as cable-free as possible.
What Are Car Pillars?
Pillars refer to the vertical supports on a car and are lettered from A-D front to back. The A-pillar, for example, is the frontmost pillar and often holds the windshield in place. The B-pillar is located behind the A-pillar and separates the front seats from the rear seats. C-pillars refer to the passenger compartment behind the rear seats. D-pillars are common among larger vehicles such as trucks or vans. By identifying these pillars, we can use these pillars to guide your cables through the frame of your car and conceal them for a seamless dash cam installation.
Now that we understand what car pillars are, we can now seamlessly integrate your dash cam with your vehicle. Here’s how you’ll route your cables:
Installing Your Front Dash Cam
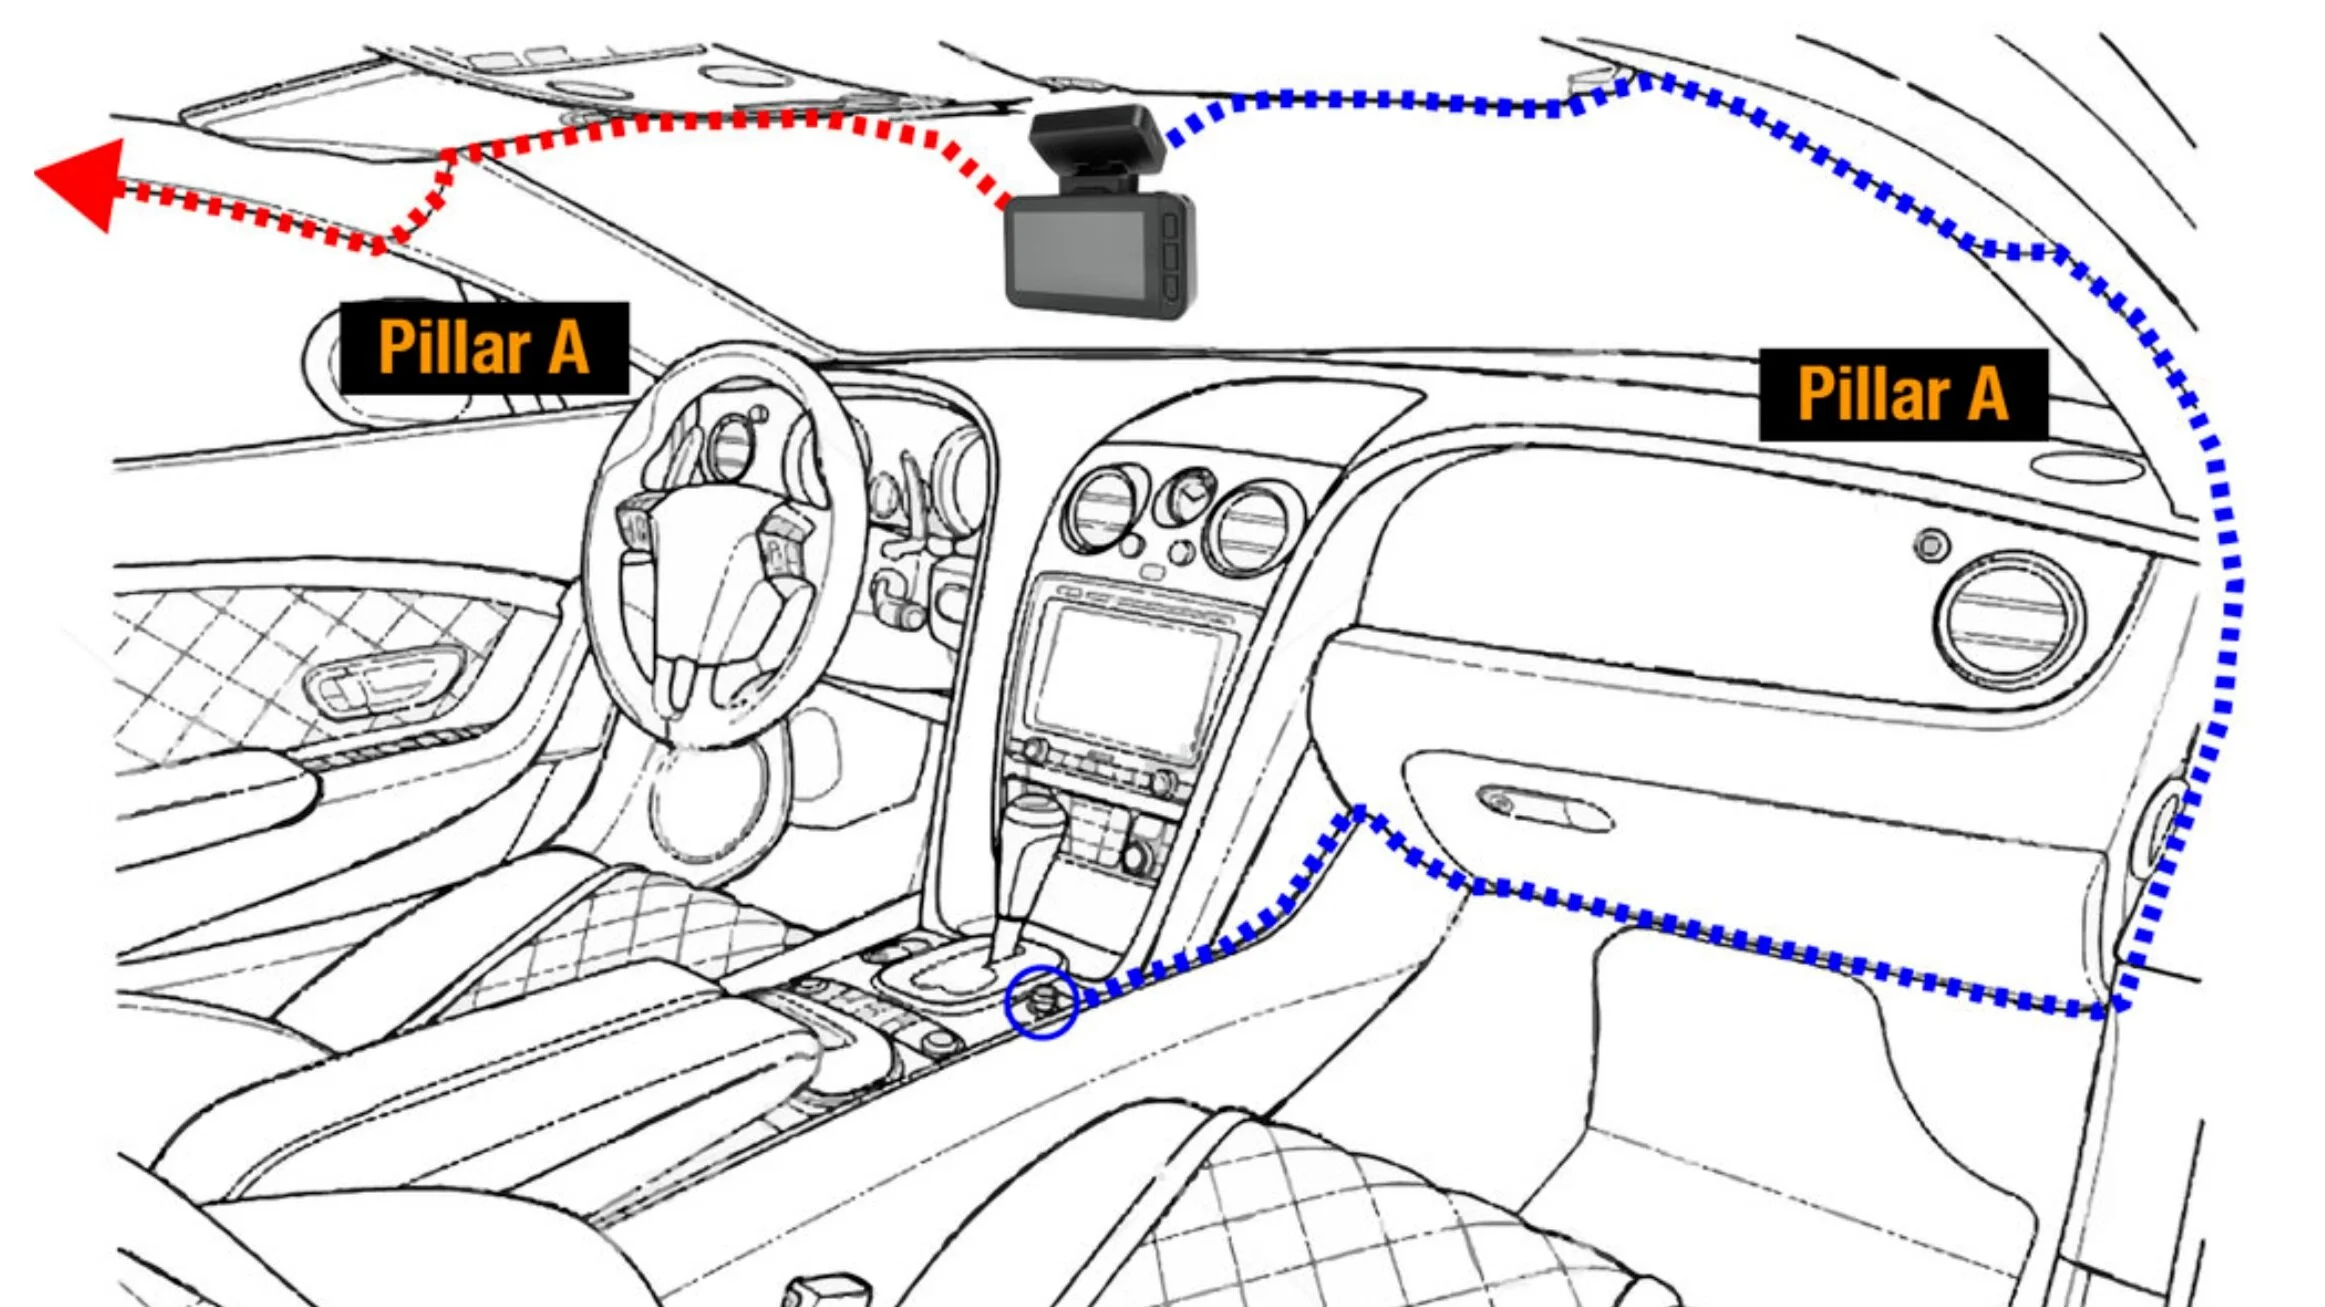
As illustrated, route your power cable inside the top headliner in the direction of the power source, either to the left or right. Continue through the headliner and with a trim tool, pry open the A-Pillar covering and tuck the cable inside the crevice of the A-Pillar.
Route the cable down the A-pillar by hiding the cable inside the rubber weather strip. Use a trim tool to help tuck the cable in. Continue routing the cable through the underside of your dashboard and plug the cable into your power source to finish.
TIP: If your cable is loose and does not hold inside the headliner, you can use adhesive cable clips to hold your cable in place.
Installing Your Rear Dash Cam
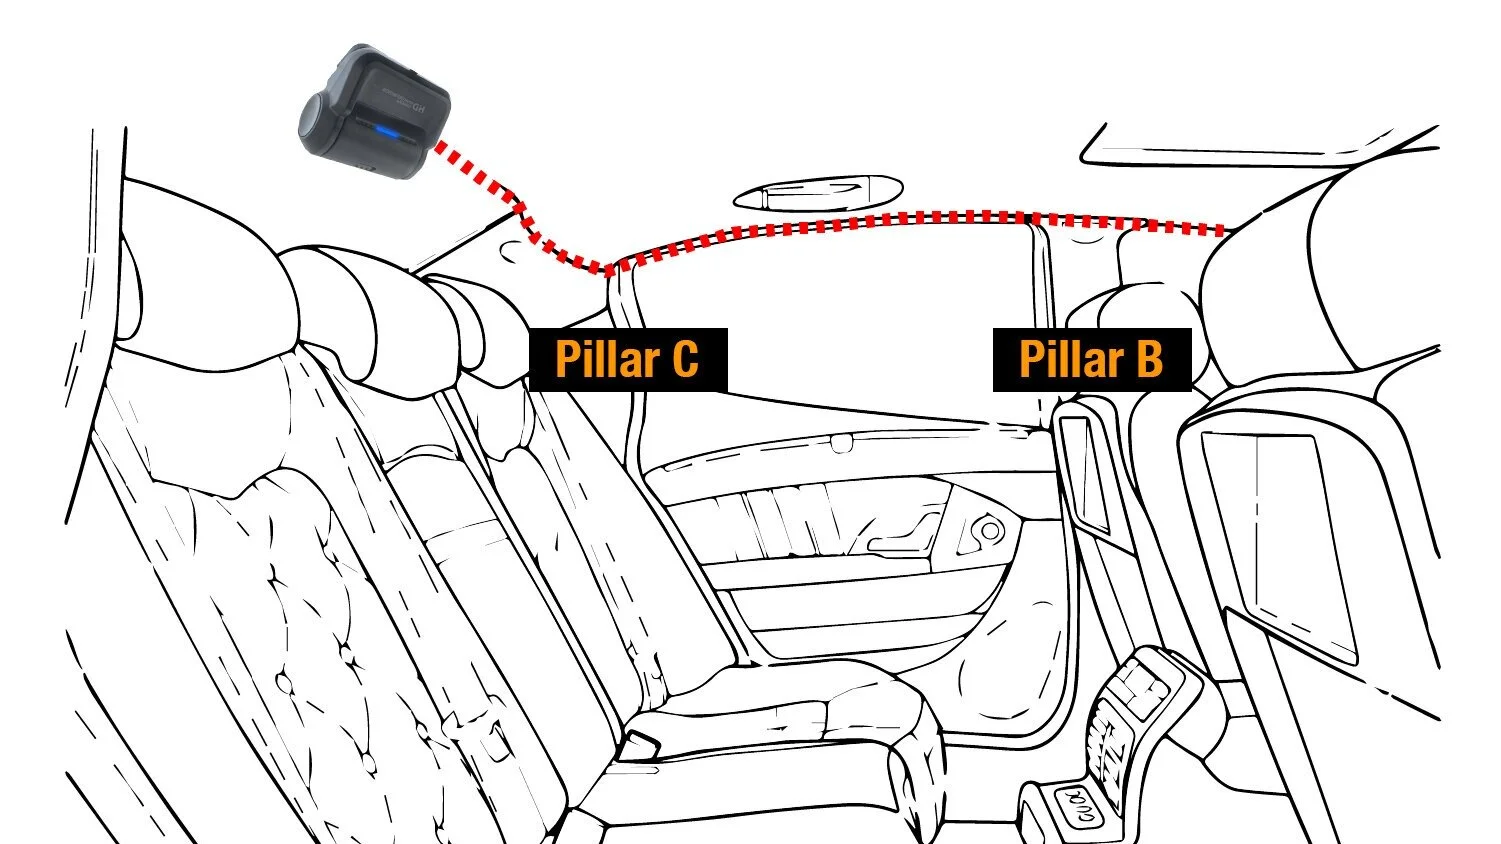
For users who have a rear dash cam, the same installation concept as the front dash cam can be applied to the rear camera. Depending on your vehicle, a longer cable may be required.
As illustrated, place the rear camera at the top center of your rear windshield. This placement is ideal as it covers the maximum amount of angle from the left to right side. Once mounted, route the rear camera cable inside the headliner of your rear windshield and continue down the pillars inside the rubber weather strip until you reach the A-pillar. Make sure you are routing your rear camera cable in the opposite direction of your front cable to avoid overlapping.
Once you reach the A-pillar, proceed to route the rear camera cable into the front windshield’s headliner until you reach the front dash cam. Plug the rear camera cable into the front dash cam to finish the rear camera installation.
Steps After Installation
Once you’ve completed installing your dash cam, you’ll want to configure the settings such as resolution, time and date, recording times, parking mode, and so on. Once everything is set up, you’re ready to start using your dash cam!
Remember to check in on your device periodically. Make sure that it’s securely mounted in place and always inspect cables for signs of wear and tear. Additionally, check video clips regularly to ensure that they are being recorded properly. Taking these small steps will help you get the most out of your dash cam and keep yourself safe on the roads.
Regular Maintenance Requirements
Regular maintenance of your dash cam is essential to keeping it in good working condition. Without proper upkeep, you may find that your device stops functioning as well as it did when you first installed it. Here are a few key steps to take to keep your dash cam working effectively:
Check the mounting hardware and cables every month or two. Make sure that all screws and fastenings are tight and secure, and look for any signs of fraying or damage on the cables.
Clean the lens once a month using lens wipes and a soft cloth. This will help ensure that images are clear and videos are of high quality.
Back up video files periodically so that if anything happens, you have copies stored safely elsewhere.
If your dash cam has GPS, make sure to update its software periodically for accurate tracking information and location data.
By taking these simple steps, you can be sure that your dash cam will continue to perform at its best for years to come!
FAQs
Do I need any special tools?
No, in most cases, you will not need any special tools. Out of the box, you should have everything you need. A trim tool, however, will come in handy and help you route the cables within your vehicle.
Where should I install my dashcam?
The most ideal place and position for a dash cam to be installed is at the center of your windshield and behind the rear-view mirror. By placing it behind your rear-view mirror, your dash cam won’t be able to obstruct the driver’s view. In addition, centering your dash cam will help maximize your viewing angle. For rear-view mirror dash cams, you can simply attach it on top of your vehicle’s existing rear-view mirror.
How long does it take?
Installing your dash cam can take anywhere from 15-30 minutes and should progressively get shorter once you’ve familiarized yourself with your first install. The time to install your dash cam can also vary depending on your model. If it is your first time, allow yourself enough time to read through the user manual and get acquainted with your device. Once you have all the necessary information and tools, setting up your dashcam is a very straightforward and easy process.
Is It Legal To Install A Dashcam In My Car?
The answer depends on where you are. Some countries have no regulations against the usage of dash cams while others prohibit their use altogether.
In the United States, there are no federal regulations against the use of dash cams. However, most states prohibit the use of the dash cam if it interferes with your ability to drive safely. For example, in California, there are certain restrictions to the size and placement of devices on your windshield. Consent law states place certain restrictions on how audio can be recorded. In states such as California, Delaware, Florida, Illinois, Maryland, Massachusetts, Montana, Nevada, New Hampshire, Pennsylvania, and Washington, all party consent laws apply and require each member of a party to agree to have their audio recorded. Check with your local jurisdiction for more information.
In Europe, laws vary from country to country. Countries such as the UK and Germany allow the use of dash cams while other countries like France and Italy have more restrictive laws. Switzerland on the other hand have banned their usage entirely.
These examples demonstrate that although most countries allow the use of dash cams, it is always in your best interest to check with your local jurisdiction before installing one. T
How Long Does A Dashcam Battery Last?
Some key factors to consider:
Environmental temperatures can affect your dash cam’s battery performance. Lithium-ion batteries in particular tend to suffer from decreased lifespan and reduced efficiency in colder temperatures while extreme heat can cause the cells in lithium-ion batteries to overheat, leading to decreased capacity. To avoid any battery performance issues, choose a dash cam that uses capacitor batteries.
Casual drivers may benefit from cheaper options such as dash cams with lithium-ion batteries.
If you plan to run the dash cam while parked using a Parking Mode feature, capacitor batteries
Lithium-ion and capacitor batteries are the two most prevalent types of dash cams in the market. Making the right choice will depend on many factors including your driving habits, needs, and weather conditions in your area. To learn more about the differences between lithium-ion and capacitor batteries, click here.
What Are The Benefits Of Having A Dashcam Installed?
Having a dashcam installed in your car can provide a number of benefits that range from security to convenience. From helping you avoid disputes with other drivers to providing footage for insurance claims, having a dashcam in your car is becoming increasingly popular. Here are some advantages of installing a dashcam:
Peace of Mind: Having a dashcam installed in your car can give you the peace of mind that if an incident occurs, you will have video evidence to back up your story. This helps avoid disputes with other drivers, as well as provides valuable insights into what happened during an accident.
Insurance Claims: Dashcams can also help provide proof when filing an insurance claim after an accident. By capturing footage of the scene and providing time-stamped data, you can help speed up the claims process and increase accuracy.
Cost Savings: Having a dashcam can also help save money on insurance premiums and repair costs in the long run. As dashcams become more popular, many insurers are offering discounts on their policy premiums for customers who install one in their vehicle.
Convenience: Having a dashcam also provides convenience during long drives or for those who use their cars for business purposes. Dashcams record every journey and make it easy to check back on routes taken or any incidents that may have occurred along the way.
With so many benefits associated with installing a dashcam in your vehicle, it's no wonder why this technology is becoming increasingly popular among drivers today. Investing in one could potentially save you money and provide enhanced protection and convenience while on the road—not to mention peace of mind during those unexpected moments behind the wheel!
How Do I Connect My Dashcam To My Car's Electrical System?
To safely connect your dash cam to your vehicle’s electrical system, a hardwire kit is highly recommended. Using a hardwiring kit will ensure a secure and safe connection in the event of a short circuit and protect your vehicle’s battery from potential drainage.
Conclusion
Now that you’ve reached the end of this guide, you should be ready to start setting up your own dash cam. Remember to take your time to read the instructions carefully, while getting acquainted with the settings of your dash cam. Once you’ve installed your dash cam, you can enjoy the added protection and security it provides.
Installing a dashcam in your car can be a great way to protect yourself and your property. Not only can it provide you with the evidence you need in case of an accident, but it can also help monitor the road ahead and alert you to any potential hazards.
With careful research and understanding of some features of a dash cam, you’ll be able to choose one that best fits your needs and driving habits.
Ask an Expert
Have a question? Reach out to our team and get the help you need.
Live Chat available 9AM-5PM M-F PST.
Ask an Expert
Have a question? Reach out to our team and get the help you need.Live Chat available 9AM-5PM M-F PST.